What Is the Roof Replacement Process From Start to Finish?
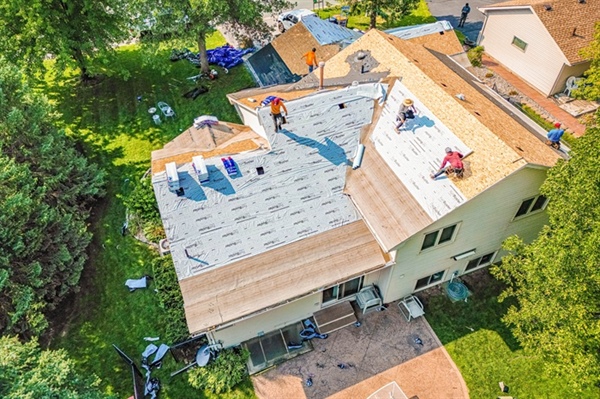
A roof replacement is one of the most significant structural upgrades a property owner will complete. From the first inspection to the final quality check, the process follows a defined sequence designed to protect the home, maintain structural integrity, and meet building code requirements. Understanding what happens at each stage removes uncertainty and helps property owners prepare for timelines, noise, debris control, and inspections.
Sharp Exteriors approaches roof replacement as a structured construction process rather than a simple material swap. It includes pre-project planning, site preparation, tear-off, decking evaluation, underlayment installation, ventilation adjustments, flashing work, shingle or membrane installation, and final inspection. The following sections explain how long a replacement takes, what preparation is required, how materials are removed and disposed of, what weather conditions affect scheduling, and how inspections confirm proper installation. If you are researching residential roof replacement, understanding each phase will give you a clear view of what to expect.
How Long Does a Full Roof Replacement Usually Take?
The timeline for a full roof replacement depends on roof size, pitch, material type, weather conditions, and structural complexity. For an average residential asphalt shingle roof between 2,000 and 3,000 square feet, installation commonly takes one to three days under normal weather conditions. Larger homes, complex rooflines with multiple valleys and dormers, or specialty materials such as metal or cedar shakes extend that timeframe. Commercial properties often require longer durations due to membrane systems, insulation layers, and drainage design.
Several measurable factors influence duration. Tear-off speed depends on the number of existing layers. Building codes in many areas allow only two layers of shingles before full removal is required. If decking damage is discovered after removal, replacement of plywood or OSB sheathing adds time. Ventilation upgrades, flashing reconstruction around chimneys and skylights, and drip edge installation also affect labor hours. Roof pitch impacts safety setup, which can slow progress on steep-slope systems.
Weather stability is another scheduling variable. Roofing materials must be installed within manufacturer temperature guidelines to maintain warranty compliance. Asphalt shingles require proper sealing temperatures, while certain adhesives used in membrane systems have cure-time requirements. During residential roof replacement projects, crews plan for continuous workflow to avoid leaving exposed decking overnight whenever possible. Proper staging, crew size, and material delivery coordination help maintain an efficient timeline.
What Preparation Is Required Before Roof Replacement Begins?
Preparation begins with structural inspection and measurement. Contractors assess the condition of decking, attic ventilation, flashing systems, and load-bearing components. Accurate measurements determine material quantities, underlayment coverage, ridge vent lengths, and flashing components. Permit requirements are reviewed to confirm compliance with local building codes, including ice barrier placement, ventilation ratios, and fastening patterns.
Site preparation protects the property and surrounding landscape. Dump trailers or roll-off containers are positioned to collect debris directly from the roof. Ground-level protection such as tarps shields siding, shrubs, and walkways. Interior preparation is also recommended because vibration from tear-off can dislodge items in attics or upper-level walls. Vehicles are typically moved away from the driveway to avoid falling debris damage.
For commercial structures undergoing commercial roof replacement, additional coordination may include safety perimeter setup, staging zones for insulation boards, and temporary drainage planning. Mechanical units located on rooftops are evaluated to confirm flashing integration. Pre-project planning reduces jobsite risks and allows installation to proceed without interruption once tear-off begins.
How Old Roofing Material Is Removed and Disposed Of
The removal process, commonly called tear-off, involves stripping all existing shingles or membrane layers down to the roof deck. Roofing shovels, pitchfork-style tools, and mechanical tear-off equipment are used to separate nails and fasteners from the decking. Crews work in sections to control debris flow and prevent overloading any single area of the roof structure. This systematic removal protects structural integrity during the process.
Once removed, materials are directed into disposal containers positioned below. Asphalt shingles are heavy; a single roofing square (100 square feet) can weigh between 200 and 350 pounds depending on composition. Proper debris management prevents hazards around the property. Nails and fasteners are collected using magnetic sweepers to reduce the risk of tire punctures and injuries.
Disposal follows local waste management regulations. Many jurisdictions require roofing debris to be transported to approved landfills or recycling facilities. Asphalt shingles can be recycled for use in road base material in certain regions. Responsible disposal aligns with environmental standards and municipal code compliance. Structural inspection of exposed decking follows immediately after tear-off to identify rot, delamination, or moisture damage before new underlayment is installed.
Weather Conditions That Delay Roof Installation
Roof installation is highly dependent on environmental conditions. Rain is the most immediate cause of delay because exposed decking must remain dry before underlayment and shingles are applied. Moisture trapped beneath roofing materials can compromise adhesion and promote mold growth within attic spaces. Snow and ice also prevent safe footing and proper material sealing.
Temperature extremes influence material performance. Asphalt shingles require adequate ambient temperatures to activate self-sealing strips. Installation in very cold weather may require hand-sealing with roofing cement to meet manufacturer guidelines. High heat can soften shingles, increasing the risk of scuffing during installation. Wind speeds above manufacturer thresholds can make handling large sheets of underlayment or membrane unsafe and may affect fastener placement accuracy.
Humidity levels also impact certain commercial roofing adhesives, particularly in low-slope membrane systems. Roofing schedules are often adjusted based on short-term forecasts to prevent partially completed systems from being exposed overnight. Careful planning reduces the likelihood of water intrusion during transitional stages of installation.
How Final Inspections Confirm Proper Roof Installation
Final inspection verifies that installation meets building code standards and manufacturer specifications. Inspectors review flashing placement around penetrations, confirm proper shingle offset patterns, and check ridge vent alignment. Fastener placement is evaluated to confirm nail depth and spacing follow required patterns. Underlayment overlap and ice barrier installation are examined where applicable.
Ventilation performance is another critical component of inspection. Balanced intake and exhaust airflow helps regulate attic temperature and moisture levels. Improper ventilation can void manufacturer warranties and reduce shingle lifespan. Inspectors may verify soffit vent clearance, ridge vent length, and unobstructed airflow pathways.
Documentation completes the process. Warranty registration, permit closure, and photographic records of completed work provide long-term value for property owners. If questions arise after installation, contacting Sharp Exteriors provides access to service documentation and support related to the completed roof system.
Work With Experienced Roofing Professionals
A full roof replacement involves structural assessment, code compliance, safe material removal, weather monitoring, and detailed final inspection. Sharp Exteriors, located at 16859 Welcome Avenue SE Prior Lake, MN 55372, provides comprehensive roof replacement services supported by trained crews and documented installation standards. Each project follows a structured process designed to protect property and meet regulatory requirements.
If you are planning a roof replacement and want guidance specific to your property type, contact Sharp Exteriors at 612-454-0605 or visit their contact us page to schedule a consultation. Their team can evaluate your roof, explain timelines, and outline the full installation process from preparation through final inspection.